
Educational
Low-Poly vs. High-Poly 3D Modeling: Optimization Rules for Unreal & Unity
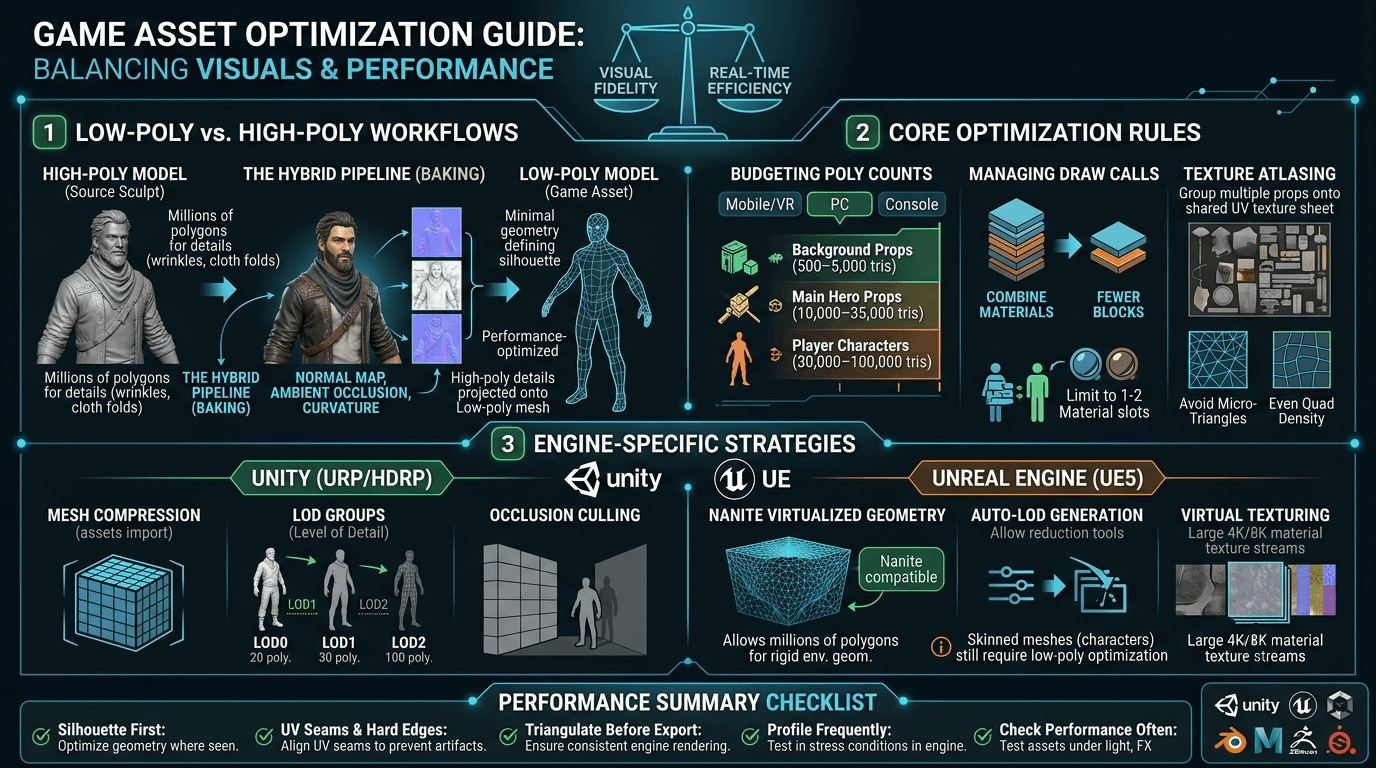
Building high-performance games requires striking a careful balance between visual fidelity and real-time efficiency. Understanding when to use low-poly assets, when to leverage high-poly sculpting, and how to bridge the two using texture baking is essential for maintaining target frame rates in Unity and Unreal Engine.
1. Defining Low-Poly vs. High-Poly Workflows
High-Poly Modeling: Used primarily for film rendering, cinematic cutscenes, and as the "source sculpt" in game pipelines. High-poly models contain millions of polygons to capture organic micro-details like wrinkles, cloth folds, and bevels. They cannot be rendered directly in real-time game engines without crippling performance.
Low-Poly Modeling: Designed specifically for real-time rendering. These meshes use minimal geometry to define silhouettes and key structural lines, keeping memory usage low and processing fast.
The Hybrid Pipeline (Baking): Modern games project detail from a high-poly sculpt onto a low-poly mesh using Normal Maps, Ambient Occlusion Maps, and Curvature Maps. This trick gives low-poly geometry the visual depth of a high-poly asset at a fraction of the performance cost.
2. Core Optimization Rules for Real-Time Assets
Budgeting Poly Counts
Triangle counts depend heavily on your target platform (Mobile, VR, PC/Console).
Background Environment Props: 500 – 5,000 tris
Main Hero Props / Weapons: 10,000 – 35,000 tris
Player Characters: 30,000 – 100,000 tris
Managing Draw Calls & Materials
Draw calls often bottleneck CPU performance before GPU limits are hit.
Combine Materials: Limit each 3D asset to 1–2 material slots. Every additional material assigned to a single mesh adds another draw call.
Texture Atlasing: Group multiple props onto a single shared UV texture sheet so the engine can batch them together.
Topology & Edge Flow
Maintain Clean Silhouette Lines: Save your polygon budget for curved edges and outer silhouettes. Internal details should be baked into texture maps.
Avoid Micro-Triangles: Triangles smaller than a pixel create sub-pixel rendering drag on the GPU. Keep quad density even across the mesh.
3. Engine-Specific Optimization Strategies
Unity (URP / HDRP)
Mesh Compression: Enable Mesh Compression in the asset import settings to reduce build file size.
LOD Groups (Level of Detail): Set up LOD Groups on your prefab. Unity automatically swaps out your base mesh (LOD0) for lower-polygon variants (LOD1, LOD2) as the camera pulls away.
Occlusion Culling: Bake static occlusion culling so Unity refrains from rendering low-poly assets hidden behind walls or terrain.
Unreal Engine (UE5)
Nanite Virtualized Geometry: Unreal Engine 5's Nanite system allows millions of polygons to be imported directly into the scene without traditional manual LOD setups. However, Nanite is best suited for rigid environmental geometry—deformable skinned meshes (like characters with skeletal rigs) still require standard low-poly optimization pipelines.
Auto-LOD Generation: If Nanite is disabled, use Unreal's built-in reduction tools to automatically generate LOD chains directly inside the Static Mesh Editor.
Virtual Texturing: Enable SVTs (Streaming Virtual Textures) to reduce memory consumption when working with 4K and 8K material passes across large level maps.
Performance Summary Checklist
Silhouette First: Optimize geometry where the camera sees the profile; let normal maps handle the surface details.
UV Seams & Hard Edges: Align UV seams directly along hard edges to prevent shading artifacts during baking.
Triangulate Before Export: Always triangulate complex geometry prior to exporting
.FBXfiles to ensure consistent rendering between modeling software and game engines.Profile Frequently: Test assets in engine under stress conditions (multiple lights, particle FX) rather than viewing them in isolation.
https://marketplace.shapeunseen.com/category/3d-design-animation